

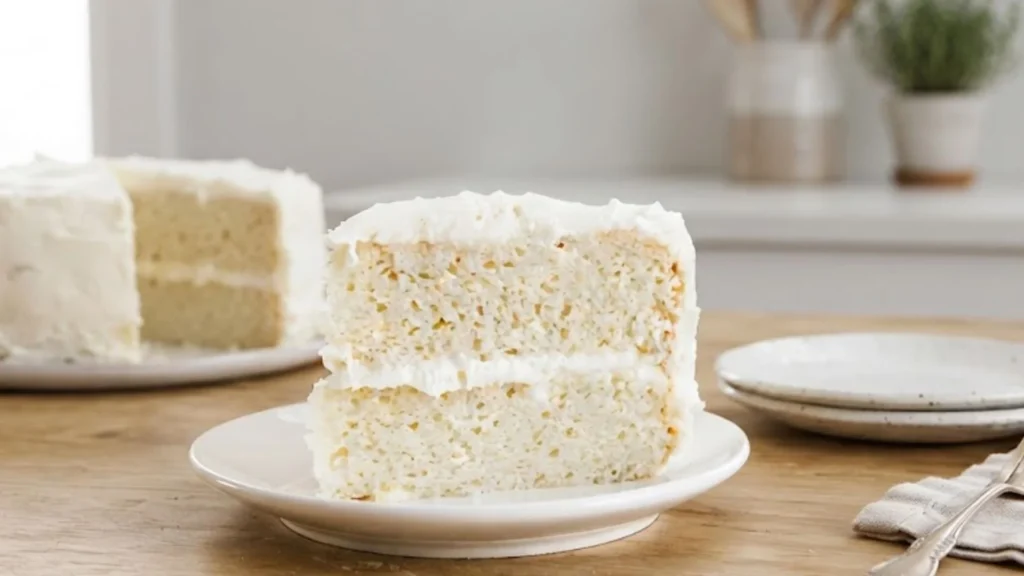
A high altitude vanilla cake recipe is a cake adjusted for baking conditions at higher elevations, where ordinary cake recipes can rise too quickly or lose their structure.
Discovering how small changes affect a cake has become a real part of my work, and creating this version gave me a different baking experience.
The main purpose was to develop a dependable vanilla cake for people who bake in high-altitude areas and often struggle with cakes that sink or turn dry.
I also wanted the process to be useful for home bakers who need practical guidance. I am sharing my method, serving ideas, tips, variations, storage guidance, and FAQs.
About This Recipe
This high altitude vanilla cake recipe is developed for baking conditions where cakes may rise too quickly, sink in the center, or become dry.
The high altitude vanilla cake recipe uses sour cream and buttermilk to help maintain a tender crumb, while vanilla gives the cake its familiar sweet character. The ingredient balance is adjusted for better structure at higher elevations.
The frosting adds a creamy finishing layer that suits the soft cake. This high altitude vanilla cake recipe also includes practical baking guidance to help avoid common problems that can occur when preparing cakes above sea level.
Recipe Overview
Preparation Time: 20 minutes
Cooking Time: 35 minutes
Total Time: 55 minutes
Course: Dessert
Cuisine: American
Cooking Style: Baking
Recipe Type: Cake
Main Ingredient: All-purpose flour
Best Served: At room temperature
Recipe Yield: 12 slices
Serving Size: 1 slice
Main Kitchen Utensils
- Two 8-inch round cake pans
- Large mixing bowl
- Medium bowl
- Electric hand mixer or stand mixer
- Measuring cups and spoons
- Rubber spatula
- Wire cooling rack
- Cake tester or toothpick
- Offset spatula
Ingredients
For the Cake
- 3 cups all-purpose flour
- 1 1/3 cups granulated sugar
- 3/4 cup unsalted butter, softened
- 1/3 cup sour cream
- 3 large eggs
- 3/4 cup buttermilk
- 1 tablespoon vanilla extract
- 1 1/2 teaspoons baking powder
- 1/4 teaspoon salt
For the Frosting
- 1/4 cup sour cream
- 6 tablespoons unsalted butter, softened
- 1 3/4 cups powdered sugar
- 1/8 teaspoon salt
- 1 teaspoon vanilla extract
Instructions
Step 1
Preheat the oven to 350°F. Grease two 8-inch round cake pans, line the bottoms with parchment paper, and lightly flour the sides.
Step 2
In a medium bowl, whisk together the flour, baking powder, and salt. Set the bowl aside while you prepare the wet ingredients.
Step 3
Beat the softened butter and sugar until light and creamy. Scrape down the sides of the bowl as needed. Add the eggs one at a time, mixing after each addition. Stir in the vanilla until the mixture is smooth.
Step 4
Add the flour mixture in small portions, alternating each addition with buttermilk. Keep the mixer on low and mix just until the flour is incorporated. Gently fold in the sour cream.
Step 5
Pour the batter evenly into the prepared cake pans. Smooth the tops using a spatula, then gently tap the pans on the counter once or twice to release any large air pockets.
Step 6
Bake for 30–35 minutes. Start checking near the end of the baking time by inserting a toothpick into the center of the cakes. It should come out clean or have a few moist crumbs. Let the cakes cool in the pans for about 10 minutes, then transfer them to a wire rack to cool completely.
Step 7
For the frosting, beat the softened butter until creamy. Gradually add the powdered sugar, followed by the sour cream, vanilla, and salt. Continue beating until the frosting is smooth and easy to spread.
Step 8
Once the cake layers are completely cool, place one layer on a serving plate and spread frosting over the top. Add the second layer, then cover the top and sides of the cake with the remaining frosting.
Notes: Use softened butter so it creams smoothly into the sugar. Room-temperature eggs blend more evenly into the batter. Full-fat sour cream gives the cake a tender texture, while buttermilk adds moisture and a mild tang. Measure the flour carefully because too much flour can make a high-altitude cake heavy.
Nutrition Facts Of High Altitude Vanilla Cake Recipe
| Calories | 430 calories |
| Carbohydrates | 58 grams |
| Sugar | 39 grams |
| Protein | 6 grams |
| Total Fat | 20 grams |
| Saturated Fat | 12 grams |
| Cholesterol | 90 milligrams |
| Sodium | 180 milligrams |
| Fiber | 1 gram |
What Makes This Cake Different?
The main difference comes from the adjustments made for high-altitude baking. At higher elevations, lower air pressure can cause cake batter to expand faster, which may leave the center weak or cause the cake to fall after rising.
This high altitude vanilla cake recipe uses a carefully balanced amount of flour, sugar, liquid, and leavening to support a more stable structure.
Sour cream and buttermilk help keep the crumb tender instead of dry. The vanilla base also gives the cake a pleasant sweetness that pairs naturally with the creamy frosting.
Why This Recipe Is a Must-Try
This high altitude vanilla cake recipe is a great choice when regular cake recipes do not work well at high altitude. The ingredient amounts are adjusted to help the cake rise properly and hold its shape without sinking in the middle.
Sour cream and buttermilk keep the cake soft and tender, while vanilla gives it a familiar homemade taste. The creamy frosting adds a sweet finish to every layer.
If baking at higher elevations has been frustrating before, this high altitude vanilla cake recipe gives you a reliable way to get a soft, well-risen cake at home.

Tips For Making
1. Measure the flour, butter, eggs, buttermilk, and sour cream before starting. Having everything ready keeps the process organized.
2. Let the butter reach room temperature before mixing. Soft butter blends more easily into the sugar and helps create a smooth batter.
3. Once the flour goes in, mix only until the ingredients are incorporated. Too much mixing can make the cake dense.
4. Split the batter between the two cake pans as evenly as possible. A kitchen scale can help create layers of similar thickness.
5. Heat the oven before the batter is ready. Starting in a properly heated oven helps the cake bake more evenly.
6. Avoid opening the oven repeatedly during baking. Sudden temperature changes can affect the cake’s rise.
7. Let the cake layers cool completely before spreading the frosting. Warm layers can cause the frosting to soften and slide.
My Favorite Ways To Serve
The high altitude vanilla cake recipe tastes lovely when served at room temperature, especially alongside fresh strawberries, blueberries, or raspberries.
A little whipped cream adds a soft and creamy touch, while vanilla ice cream makes the dessert richer and more indulgent. For birthdays and family gatherings, colorful sprinkles or fresh fruit can make the cake look more inviting.
A thin layer of berry jam between the layers also adds a pleasant fruity taste. For an afternoon treat, serve a slice beside a cup of coffee or tea.
When To Serve
The high altitude vanilla cake recipe is a lovely choice for birthdays, family gatherings, afternoon tea, weekend desserts, and holiday celebrations.
Serve high altitude vanilla cake recipe after lunch or dinner when a light vanilla dessert is wanted. It also works nicely for casual get-togethers, bake sales, and small celebrations.
For the best texture, let the high altitude vanilla cake recipe come to room temperature before serving so the crumb stays soft and the frosting remains creamy.
Health Benefits
Eggs, buttermilk, and sour cream add protein and calcium to this cake, while butter provides a small amount of vitamin A.
These ingredients also contribute other nutrients that can support normal body functions. The cake contains carbohydrates from flour and sugar, which provide energy.
Still, this is a sweet dessert, so I prefer enjoying a moderate slice rather than treating it as a health-focused food. Fresh berries served alongside the cake can add fruit, fiber, vitamins, and minerals to the dessert plate.
Ways To Make More Delicious
1. Add Fresh Berries
Top the frosted cake with 1 cup sliced strawberries and ½ cup fresh blueberries. The juicy fruit adds freshness and a colorful finish.
2. Add a Creamy Filling
Spread ¾ cup whipped cream between the cake layers before adding the frosting. A thin layer keeps the center soft and gives the cake a richer texture.
3. Drizzle Berry Sauce
Prepare a quick topping using 1 cup raspberries, 2 tablespoons sugar, and 1 tablespoon lemon juice. Cook until the berries soften, then cool and spoon about 2 tablespoons over each slice.
4. Add Toasted Nuts
Sprinkle ½ cup chopped pecans or almonds over the frosting. Toast the nuts for about 5–7 minutes at 350°F before using them for a deeper nutty taste and gentle crunch.
5. Serve It With Ice Cream
Place one slice of cake beside ½ cup vanilla or strawberry ice cream. Add 1 tablespoon chocolate sauce or 1 tablespoon caramel sauce on top for an extra dessert-style finish.
Storage Instructions
Store the frosted high altitude vanilla cake recipe in an airtight cake container and keep it in the refrigerator for up to 4 days.
Before serving, leave the cake at room temperature for 20–30 minutes so the frosting becomes soft and creamy. Unfrosted cake layers can be wrapped tightly and kept at room temperature for 1 day or refrigerated for up to 3 days.
For longer storage, wrap individual slices tightly and place them in a freezer-safe container for up to 2 months. This helps protect the cake from drying out and keeps the vanilla taste fresh.
Frequently Asked Questions
Why does high altitude affect vanilla cake?
Higher elevations have lower air pressure, so cake batter can expand faster during baking. This can cause the center to rise too quickly and then collapse.
Can I use regular all-purpose flour?
Yes. All-purpose flour works well for this recipe. Measure it accurately because too much flour can make the cake heavy.
Can I bake this cake in one large pan?
The recipe is written for two 8-inch round pans. Using a different pan can change the baking time, so check the center before removing the cake from the oven.
Why did my cake sink in the middle?
A sunken center can happen from excess leavening, an underbaked middle, too much liquid, or opening the oven door too early. High-altitude conditions can make this problem more noticeable.
Can I replace buttermilk?
You can make a quick substitute by mixing milk and lemon juice or vinegar. Let the mixture stand briefly before adding it to the batter.
Final Thoughts
The high altitude vanilla cake recipe has been a wonderful recipe to work on because I was able to understand how small baking adjustments can affect the final cake.
After preparing the high altitude vanilla cake recipe, I was happy to see the soft texture, gentle vanilla taste, and creamy frosting come together nicely.
I have shared the ingredients, baking process, serving ideas, and storage details based on my high altitude vanilla cake recipe experience.
I hope you will give this high altitude vanilla cake recipe a try in your own kitchen and enjoy the baking process as much as I did. I would love for this high altitude vanilla cake recipe to become a sweet part of your family table.
More Homemade Favorites
Easy Vanilla Bourbon Cake Recipe From Scratch
Vanilla Olive Oil Cake Recipe | Best Here’s
Layered Pumpkin Cheesecake Recipe (Extra Taste)
Strawberry Vanilla Marble Cake | Best Dessert
Moist Vanilla Cake With Chocolate Ganache

High Altitude Vanilla Cake Recipe
Equipment
- Two 8-inch round cake pans
- Large mixing bowl
- Medium bowl
- Electric hand mixer or stand mixer
- Measuring cups and spoons
- Rubber spatula
- Wire cooling rack
- Cake tester or toothpick
- Offset spatula
Ingredients
For the Cake
- 3 cups all-purpose flour
- 1 1/3 cups granulated sugar
- 3/4 cup unsalted butter softened
- 1/3 cup sour cream
- 3 large eggs
- 3/4 cup buttermilk
- 1 tablespoon vanilla extract
- 1 1/2 teaspoons baking powder
- 1/4 teaspoon salt
For the Frosting
- 1/4 cup sour cream
- 6 tablespoons unsalted butter softened
- 1 3/4 cups powdered sugar
- 1/8 teaspoon salt
- 1 teaspoon vanilla extract
Instructions
Step 1
- Preheat the oven to 350°F. Grease two 8-inch round cake pans, line the bottoms with parchment paper, and lightly flour the sides.
Step 2
- In a medium bowl, whisk together the flour, baking powder, and salt. Set the bowl aside while you prepare the wet ingredients.
Step 3
- Beat the softened butter and sugar until light and creamy. Scrape down the sides of the bowl as needed. Add the eggs one at a time, mixing after each addition. Stir in the vanilla until the mixture is smooth.
Step 4
- Add the flour mixture in small portions, alternating each addition with buttermilk. Keep the mixer on low and mix just until the flour is incorporated. Gently fold in the sour cream.
Step 5
- Pour the batter evenly into the prepared cake pans. Smooth the tops using a spatula, then gently tap the pans on the counter once or twice to release any large air pockets.
Step 6
- Bake for 30–35 minutes. Start checking near the end of the baking time by inserting a toothpick into the center of the cakes. It should come out clean or have a few moist crumbs. Let the cakes cool in the pans for about 10 minutes, then transfer them to a wire rack to cool completely.
Step 7
- For the frosting, beat the softened butter until creamy. Gradually add the powdered sugar, followed by the sour cream, vanilla, and salt. Continue beating until the frosting is smooth and easy to spread.
Step 8
- Once the cake layers are completely cool, place one layer on a serving plate and spread frosting over the top. Add the second layer, then cover the top and sides of the cake with the remaining frosting.
Notes
Nutrition Facts Of High Altitude Vanilla Cake Recipe
Calories: 430 calories | Carbohydrates: 58 grams | Sugar: 39 grams | Protein: 6 grams | Total Fat: 20 grams | Saturated Fat: 12 grams | Cholesterol: 90 milligrams | Sodium: 180 milligrams | Fiber: 1 gramWelcome! I’m Lipia, but my friends call me Koley, and you can, too! I’m a professionally trained recipe creator. Baking, cooking, writing, and teaching are my greatest passions, and I love sharing practical techniques that make every recipe easier to prepare.
My home in Bellville, Texas. I spend my days creating, testing, and refining dishes that bring people together around the table. My goal is to inspire confidence in the kitchen and help you enjoy homemade meals and desserts every day.